Through your Web Console Management tool in your SynthesisVR Account, you can launch both single-player and multiplayer sessions depending on the scenario and the number of customers. The core difference between simply launching a game remotely and starting a Session is that a Session allows SynthesisVR to control the customer’s playtime automatically.
For example, if you start a 45-minute session, customers can play one long escape-room game or switch between multiple shorter games. Once the 45 minutes expire, SynthesisVR will automatically end the session. This removes the need for you to manually track time, allowing you to focus fully on the customer experience while the Web Console automations handles the Session.
You also have full control during the session: you can extend the playtime (either paid or complimentary), change the game remotely, or let customers change games themselves using the in-headset 2D or 3D VR menu.
Every session is linked to an Experience Type, which defines the available session durations, pricing, and the games included in that experience. This gives you complete flexibility in how you package and sell SynthesisVR-licensed content.
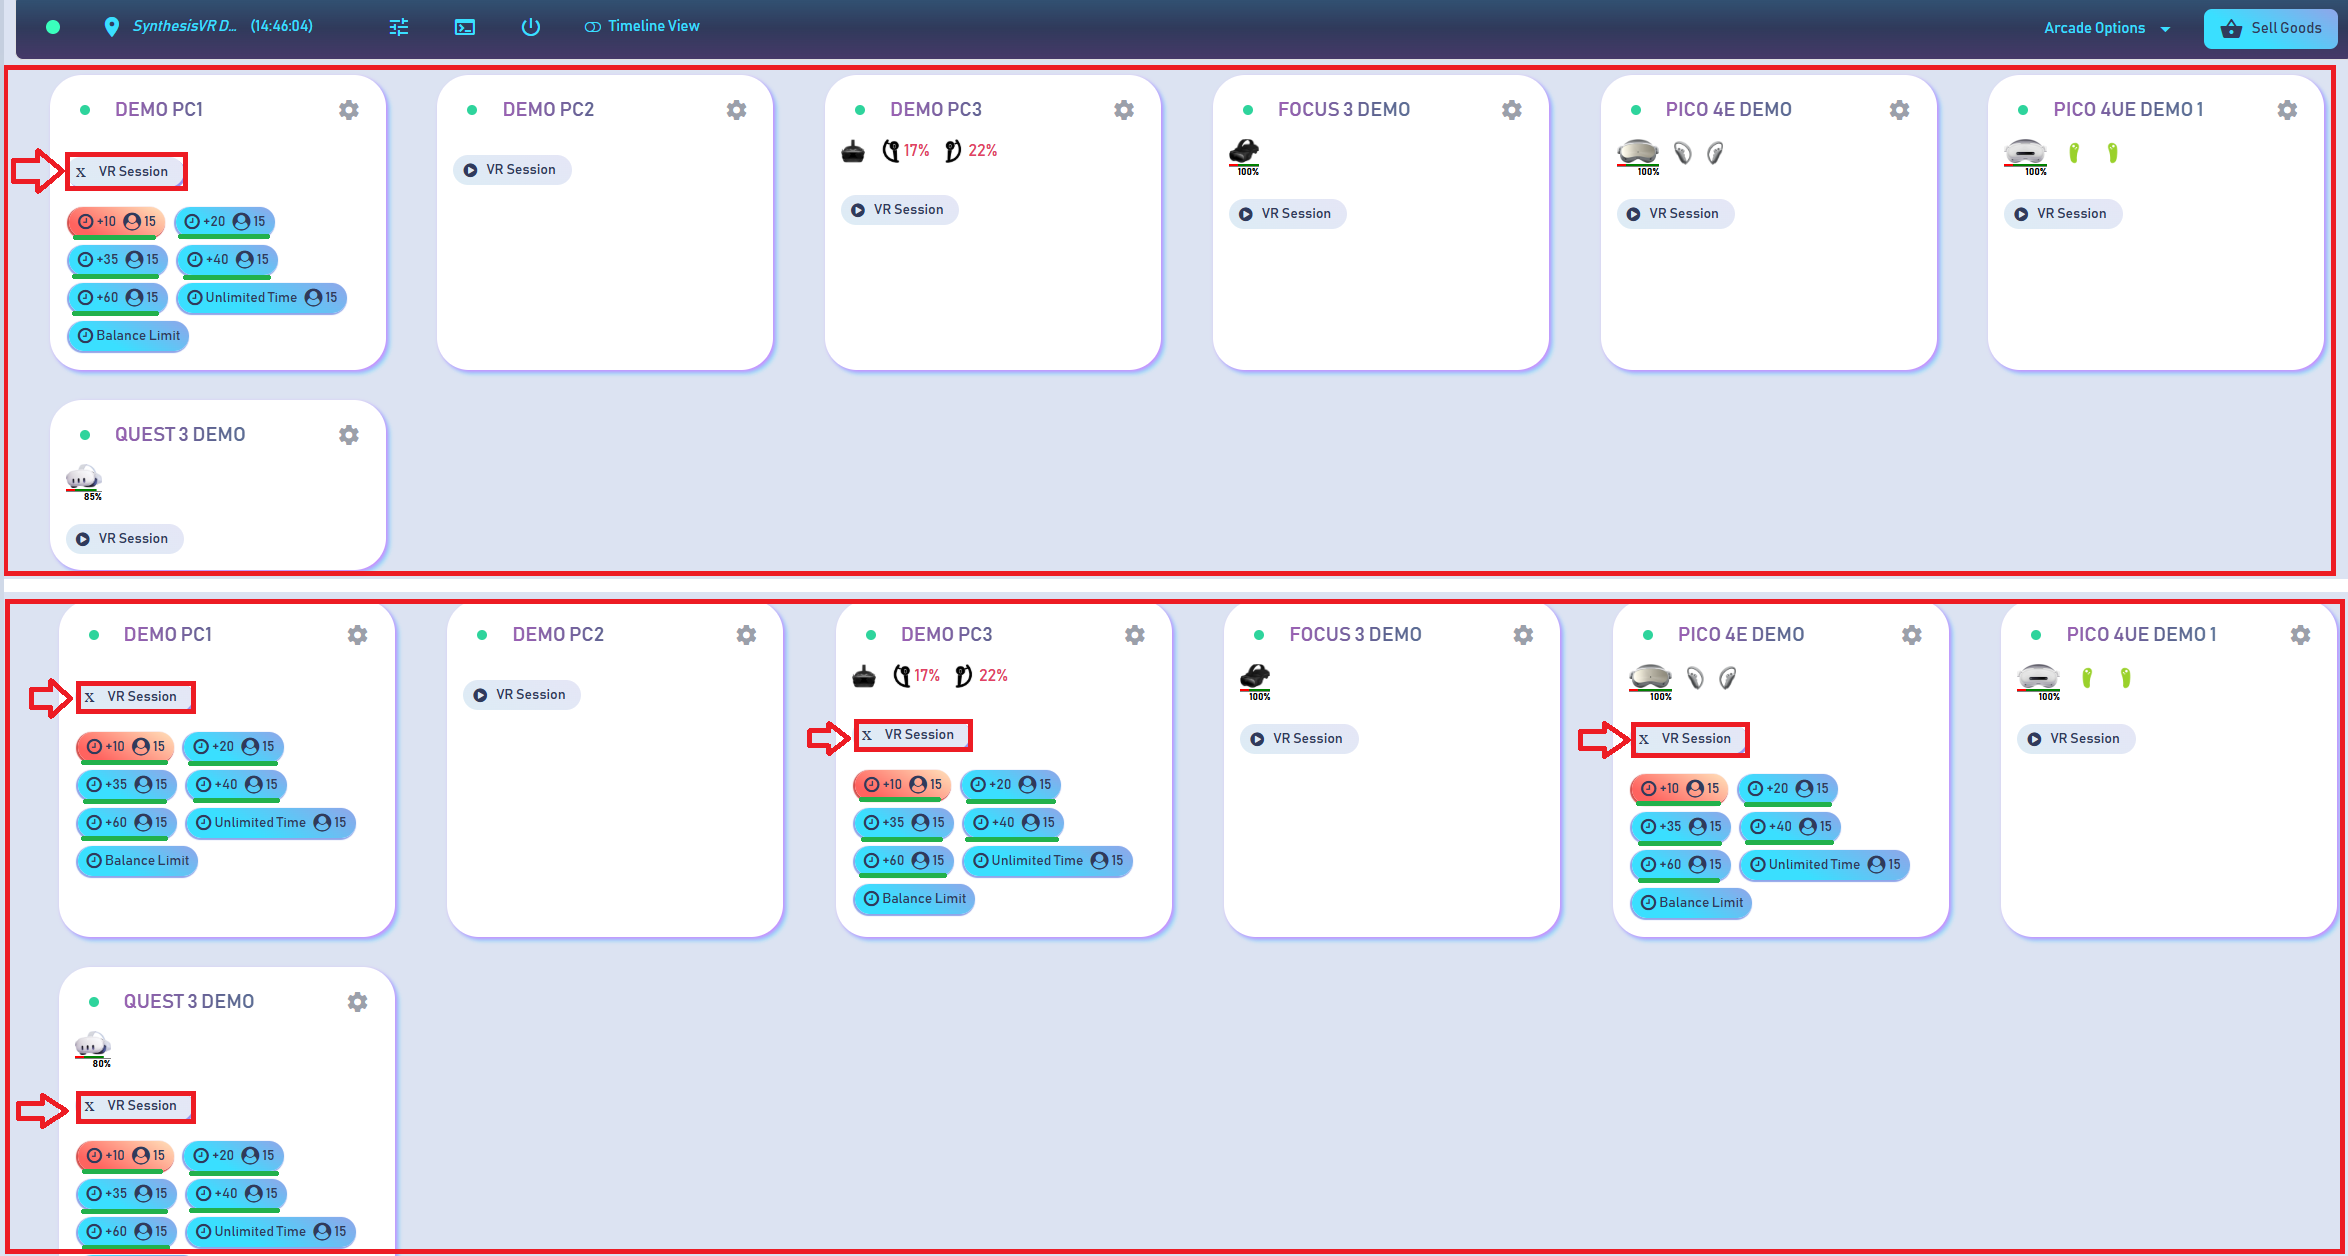
Step 1: Select the Game Station or Game Stations where you want to start the session
From the Web Management dashboard, click on the Experience Type shown under the name of your Game Station. This will open the list of available session durations. If you select the same Experience Type on multiple stations, those stations will prepared to be grouped into a single multiplayer session.
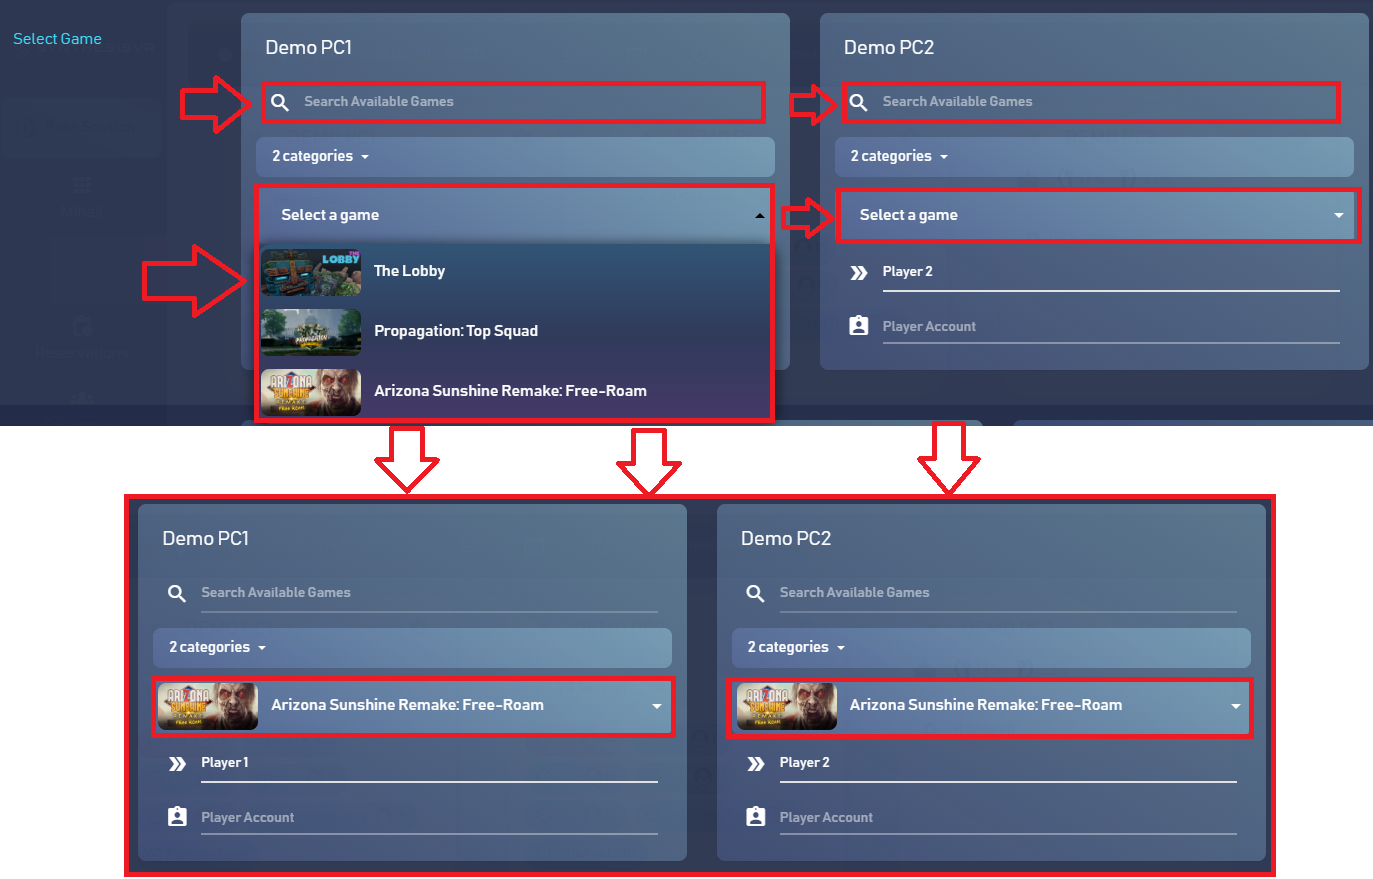
Step 2: Game Selection Window Overview
From the Game Selection panel, choose the game you want to launch when the Session begins. You can assign different games to each Game Station or select the same game for all of them. If the same game is selected on multiple stations and it supports multiplayer with SynthesisVR automations, the players will automatically be placed in the same multiplayer lobby (you can confirm this on the dedicated game’s page in the SynthesisVR Web Library). Additionally, you can enable and configure extra options before starting the Session.
You can find detailed explanations of each menu within the Game Selection window further down on this page.
After selecting and preparing the game for your Game Stations, review the remaining options and adjust them as needed. Once everything is set, click "Start Session". This will prepare the selected game (or games, depending on your choices) and send the remote command to your Game Stations to initiate the launch process.

Step 3: In-Game Remote Options Setup for SynthesisVR Automated Games
Some games will not start immediately after you press “Start Sessionâ€. Instead, you may see an additional pop-up window that allows you to configure the mandatory and optional in-game settings before the game launches. These automations are developed in direct collaboration between SynthesisVR and the Game Studio, where the developer agree to create a Arcade functionalities for their games.
For such titles, the in-game settings are extracted from the game and presented directly to the VR business operator. This approach saves valuable customer time, especially for first-time VR users who may get confused by in-game menus. This allows the settings to be configured quickly and easily from the Admin PC before being sent remotely to the Game Stations. Each game may include different automation settings depending on how the developer integrated SynthesisVR features.
You can check which games support SynthesisVR Automation through the SynthesisVR Web Game Library.
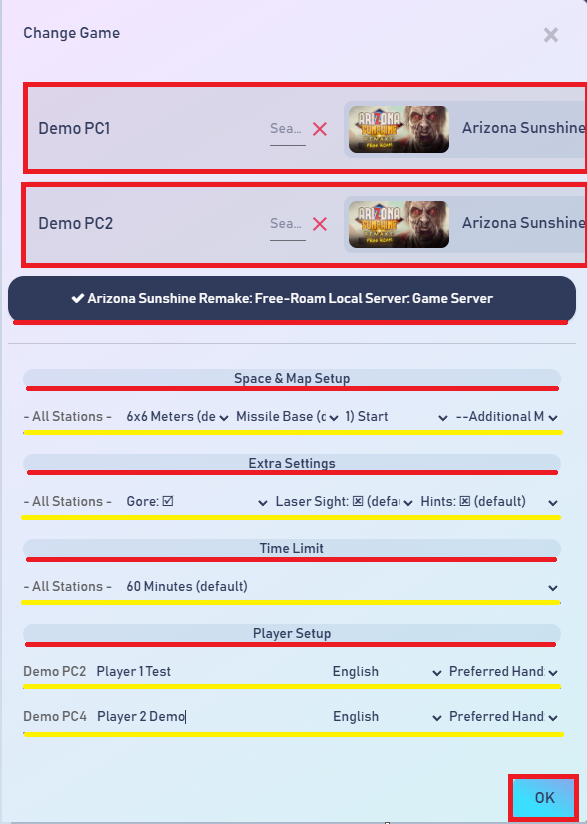
After configuring all required options and clicking “OK,†the game will launch on the selected Game Stations using the settings you defined for each player. The Dashboard will then switch to a new Session view, showing all Game Stations that are part of the active Session along with a new set of admin controls dedicated to managing that ongoing Session.
Once you have selected your Game Stations and confirmed the session duration, click on the chosen time. This will open a new window where your stations will be displayed, along with the option to select the game you want to launch remotely for your customers or start empty Session and let your customer decide alone what they want to start from our 2D or 3D VR menu. You will also have access to additional configuration options that you can enable if needed before starting the session.
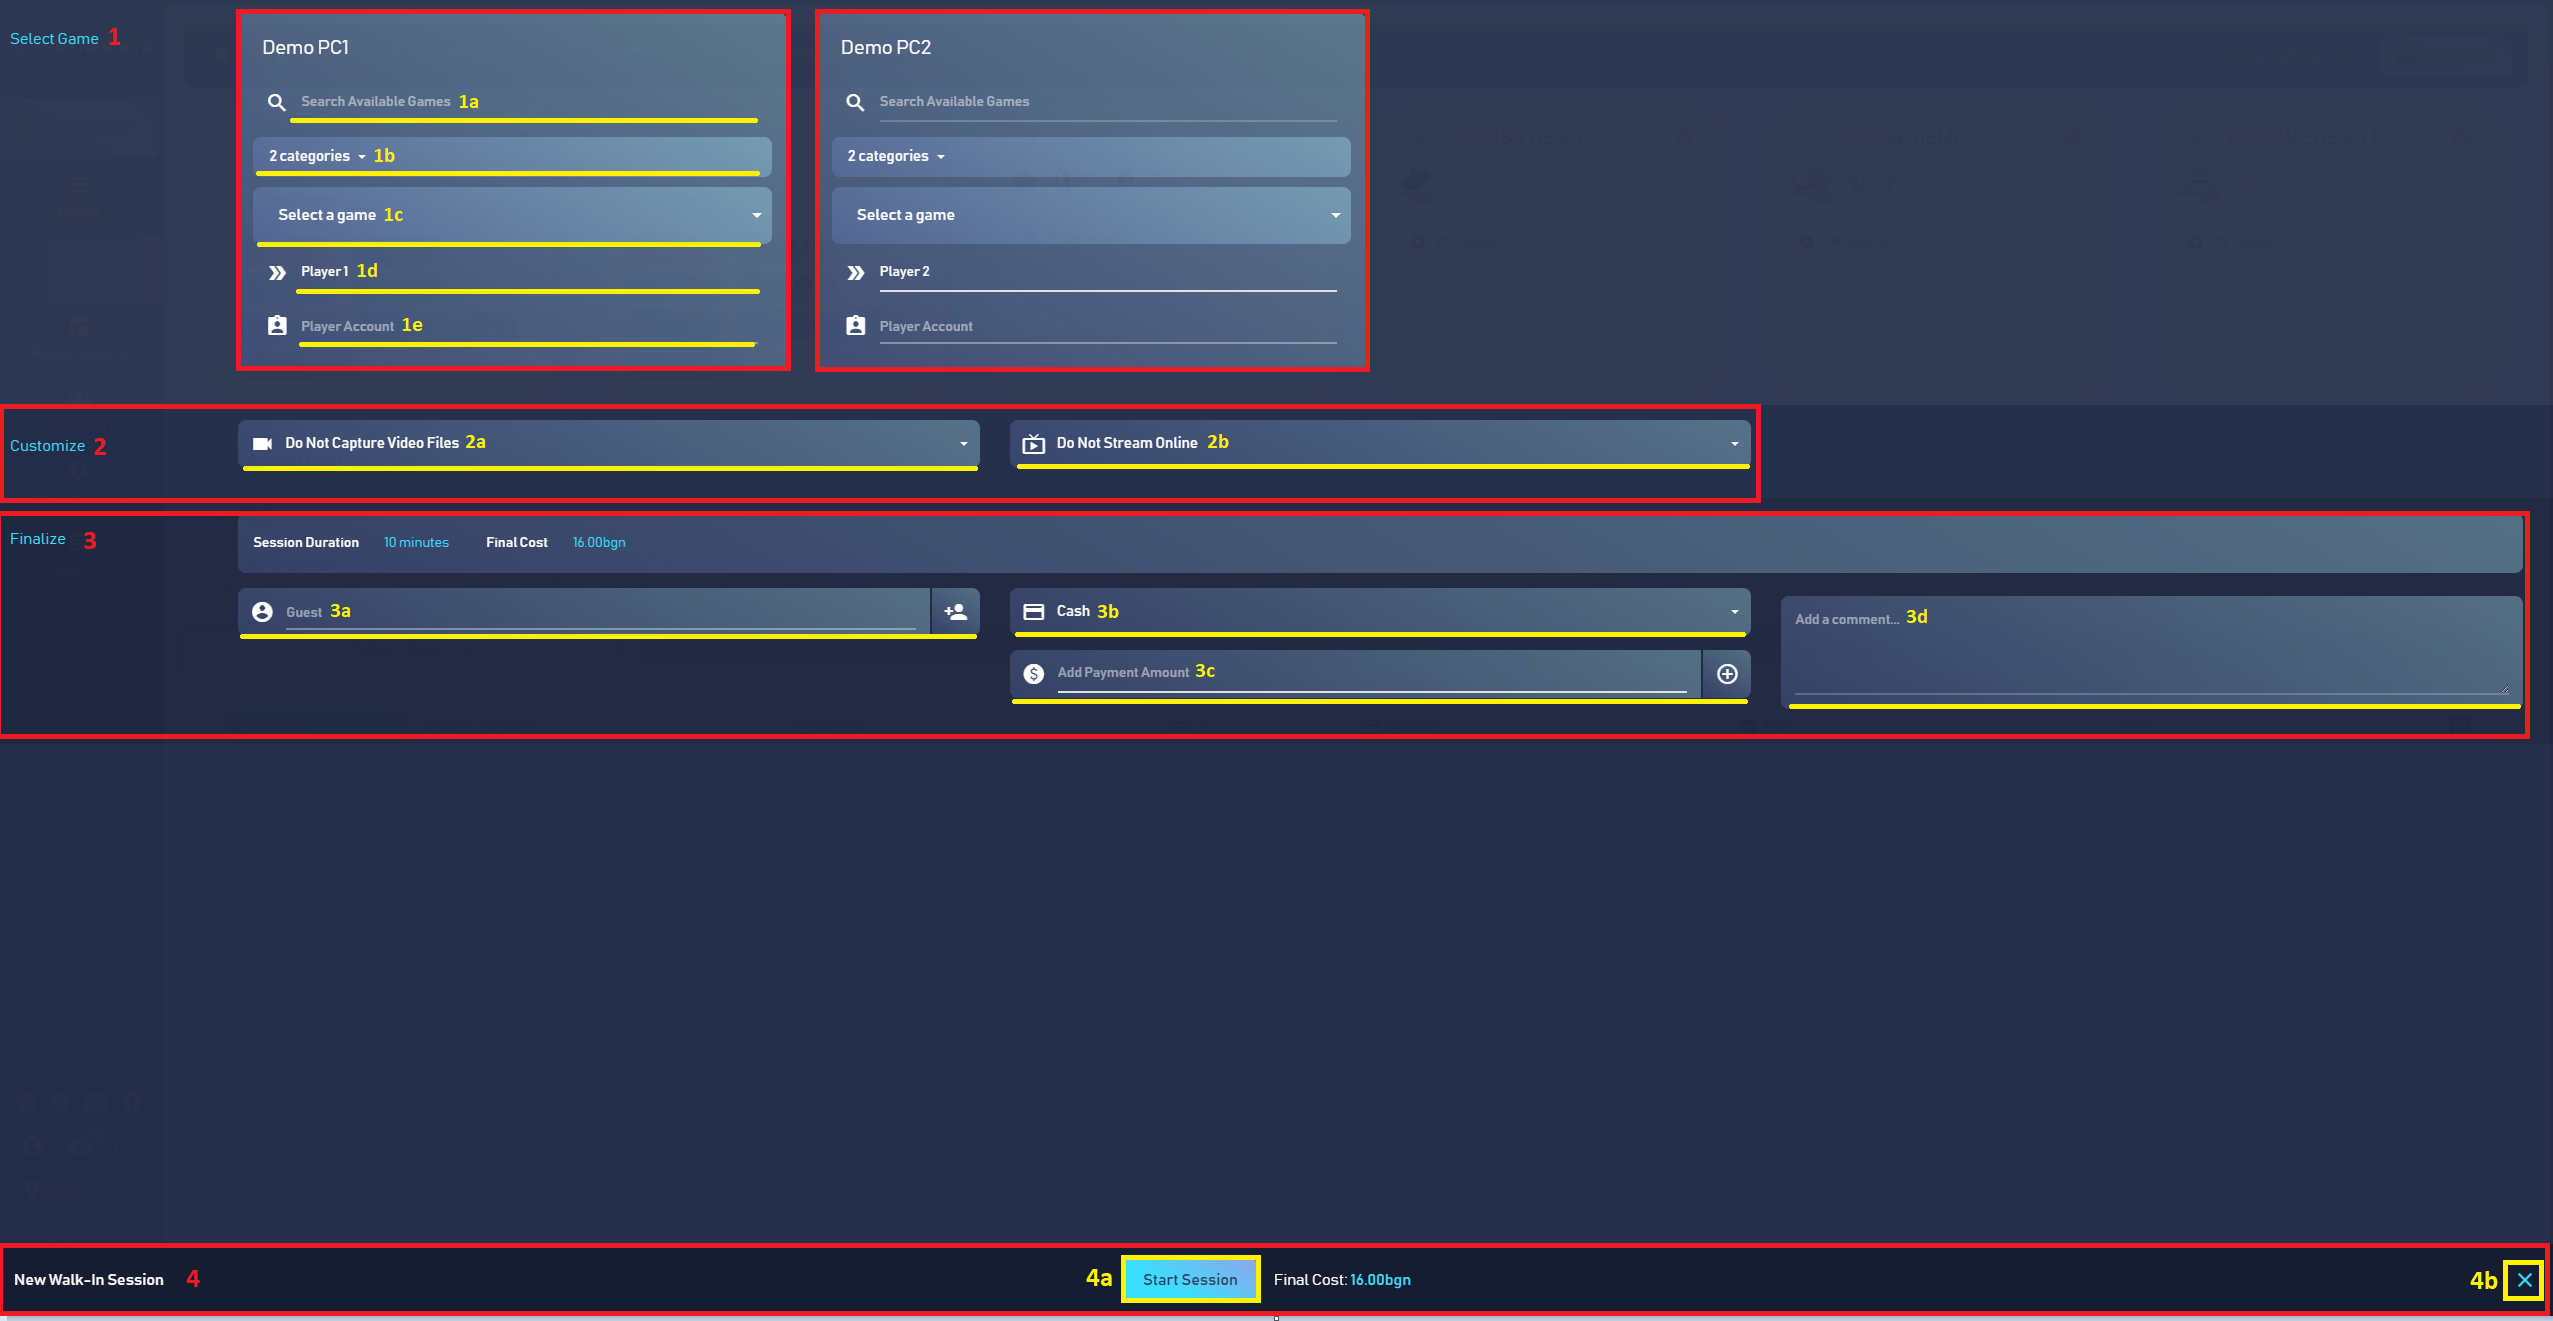
- Select Game Options – This section gives you flexible tools to quickly locate and prepare the game you want to launch for your customers. You can filter your library by game name, choose which categories you want to make available for the session, enter a custom player name, and even connect the customer’s SynthesisVR account in your SynthesisVR Web Management → Customers section to associate it with the Session.
- Search Available Games - Here you can type the name of the game you want to launch for your customers on the selected Game Stations. Once you choose a game, it will be automatically prepared for all stations that have it installed. If needed, you can still adjust the selection and choose different games for the Game Stations before starting the session.
- Categories - Using this option, you can choose which Categories from your Experience Type you want to keep active for the customer. Only the selected Categories will be available for the customer to browse and choose games from during their session.
- Select Game - You can use this dropdown list to quickly locate the game you want to prepare and launch on your Game Stations. This serves as an alternative to the “Search Available Games†option.
- Player Name - Here you can enter a custom player name for each Game Station. The name will be saved for the entire duration of the Session and automatically used inside any game that supports custom player names.
- Player Account - This menu allows you to link any customer account that is registered under your "Customers" tab inside your SynthesisVR Web Management account. By doing so, the Session data generated from this customer during gameplay will be saved to that customer’s profile. This enables features such as applying discounts, tracking visit frequency, and accessing additional customer-related insights.
- Customize - Here you can enable or disable the options such as capturing gameplay videos or streaming gameplay online, provided you have configured OBS and all required settings within SynthesisVR. You can learn more about setting up OBS for video capturing and streaming in the dedicated section here.
- Do Not Capture Video Files - This option allows you to enable gameplay video recording, provided that OBS has been set up correctly. Learn more about setting up OBS and using it for video capturing here.
- Do Not Stream Online - This option allows you to enable Online Streaming, provided that OBS has been set up correctly. Learn more about setting up OBS and using it for Online Streaming here.
- Finalize - Using this section, you can manage the financial aspects of the Session for your customers. If they have a registered account in your SynthesisVR Web Management → Customers section, you can apply it here as well. You can also add any important notes related to the Session.
- Customer Account - Link a customer’s account if it is registered under you SynthesisVR Business account. Linking a customer account allows you to apply membership benefits, use available balance, or apply vouchers to the Customer's Session. You can learn more about the Customers page and Discounts here.
- Payment Type - Here you can select the payment method your customer will use for the Session. You can process cash payments or POS/card payments if you have configured an Online Payment Provider under your SynthesisVR account. You can read more about setting up an Online Payment Provider for card and online payments here.
- Add Payment Amount - Using this option, you can split the total amount your customer needs to pay for their Session. For example, you can select “Cash†as the payment type and enter 50% of the amount, then switch to “POS†to charge the remaining 50%. This flexibility also allows you to combine customer vouchers and Reward Points from their SynthesisVR account together with cash or POS payments.
- Comments - Here you can add comments for the Session, which will be saved under your SynthesisVR Account → Reservations for future reference. This is useful for leaving notes between staff members and marking important details about specific Sessions.
- New Walk-In Session - From here, you can initiate the start of the Session or close the window if you need to make changes to the selected Game Stations or the chosen Session duration.
- Start Session - From here, you can start the Session. This will send the remote command to the selected Game Stations along with all configured options, such as the chosen game and player names - and initiate the game launch using those options.
- Close Button - From here, you can close this window if you need to make changes to the selected Game Stations or the Session duration before initiating a new Session.
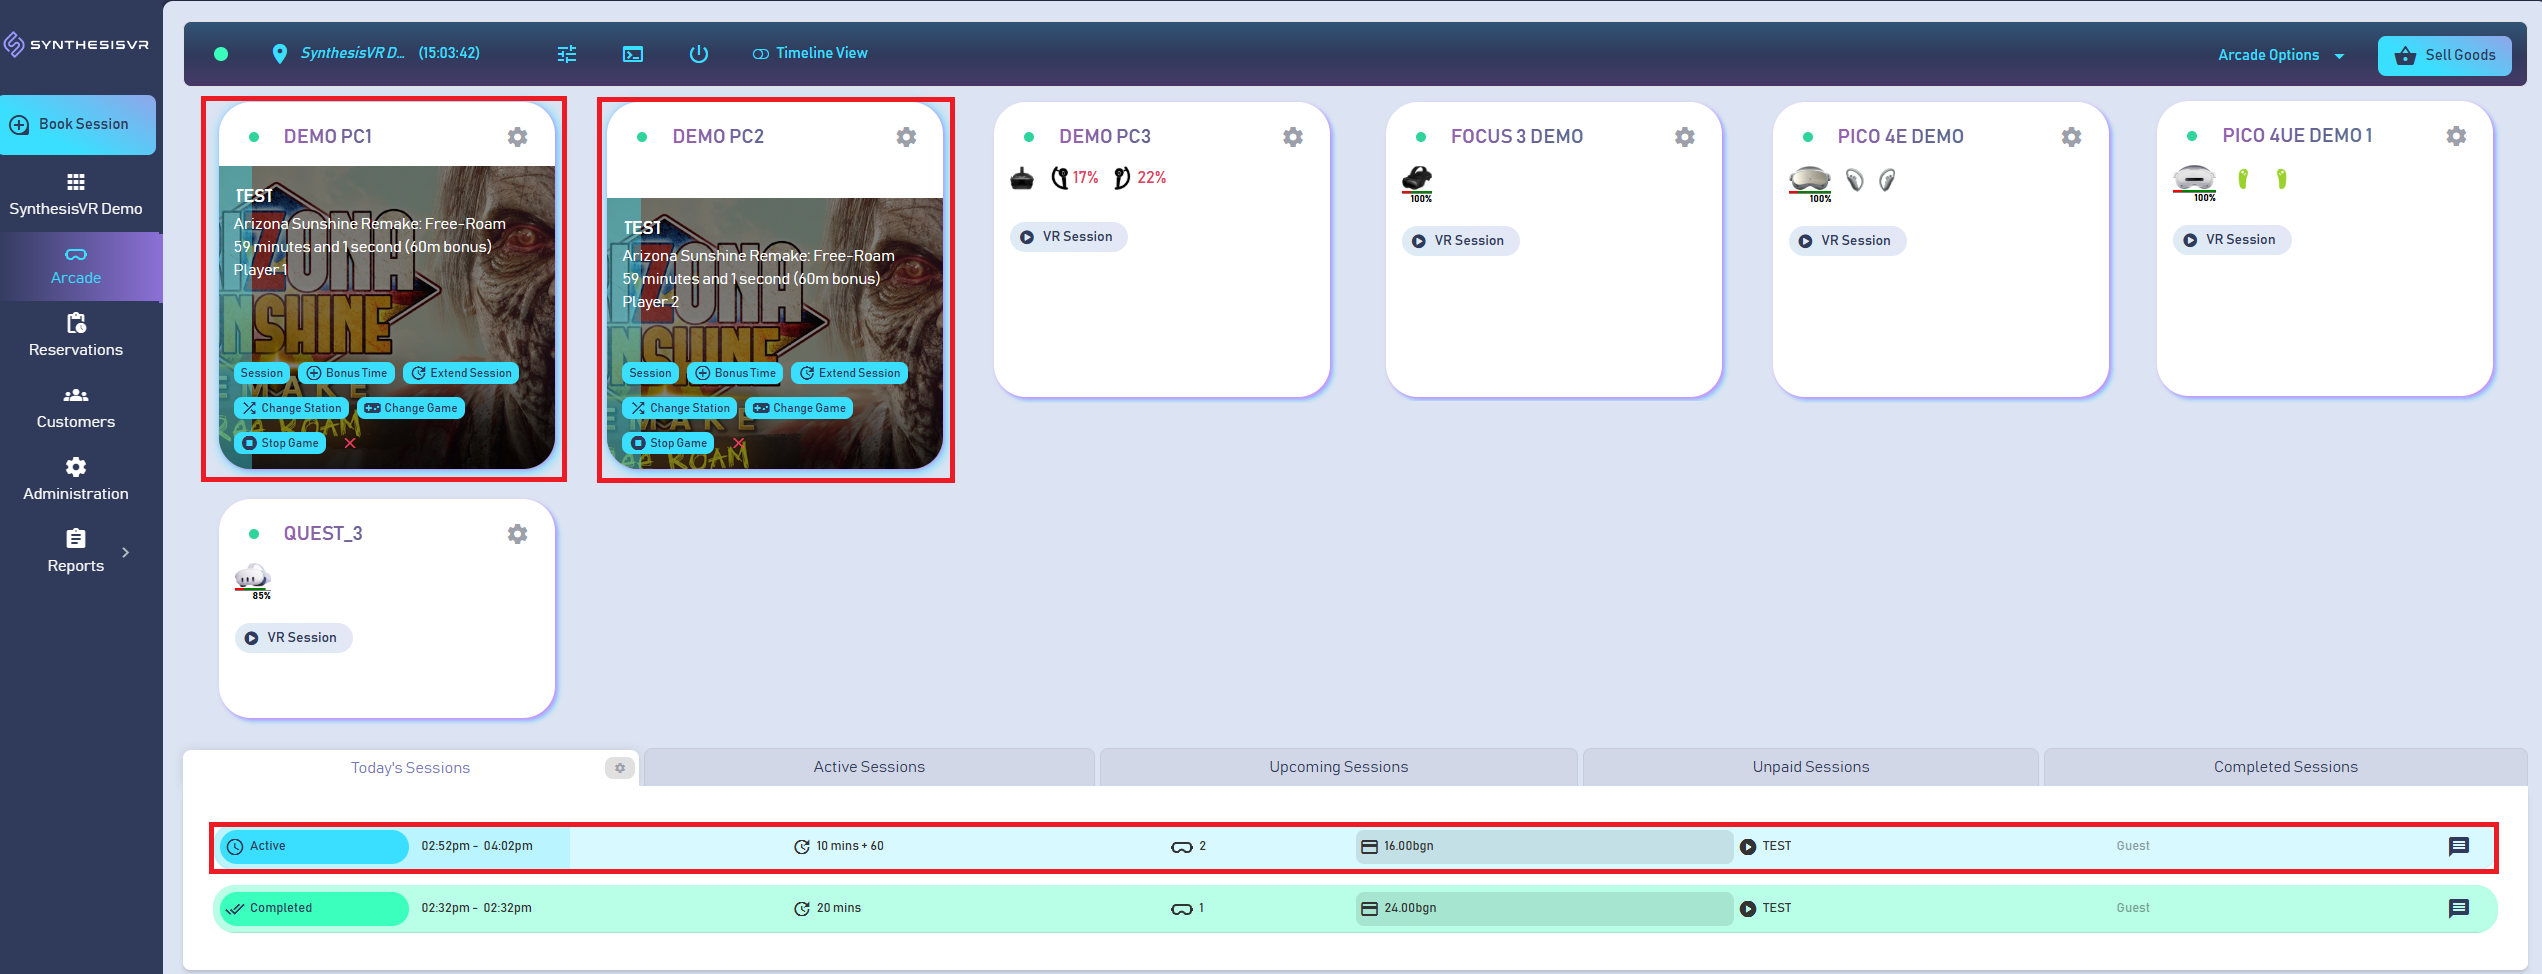
Once a Session is started, the Dashboard layout changes to indicate which Game Stations are currently running an active Session. You will see a Session timer for each station, which SynthesisVR uses to determine when gameplay should automatically stop. This layout also provides a set of Session-specific actions and controls that you can use to manage the players while they are in the game.
Session Operations
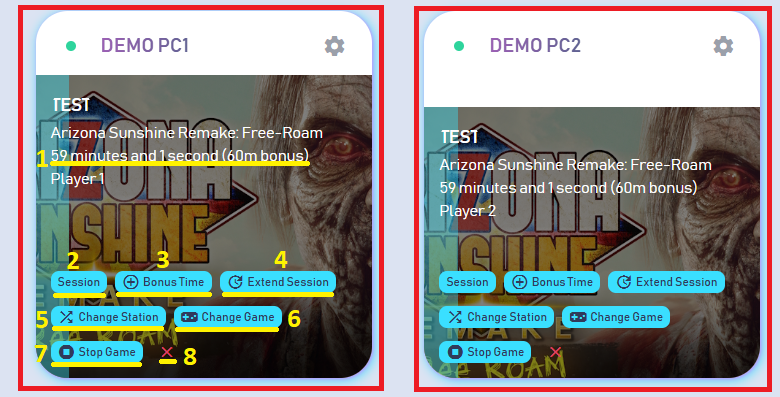
- Session Duration - Here you can check the remaining time for each active Session. When the timer reaches zero, SynthesisVR will automatically end the Session. Any bonus time you add during the Session will also appear here and will be included in the remaining duration.
- Session - You can use this button to reopen the Session window if you need to review or modify any details of the running Session.
- Bonus Time - Using this option, you can add Bonus Time to the Game Station without charging the customer. If needed, you can also deduct time from the Session.
- Extend Session - With this option, you can add extra playtime that will be billed to the customer according to the rates defined in your Experience Type. This is useful when a customer wants additional time beyond the original Session duration, without the need to start a completely new Session once the current one ends.
- Change Station - This option allows you to move the active Session to another Game Station if technical issues occur on the current one, without interrupting the customer’s gameplay.
- Change Game - Using this option, you can change the currently running game on the Game Station if the customer requests a different title or if you want to start a new game for them after they finish the previous one.
- Stop Game - With this option, you can stop the game that is currently running on the Game Station.
- Stop Session - Using this button, you can manually stop the active Session if you need to end it early, without waiting for the automatic timeout at the end of the Session timer.
 US
US